×
- Hello
- Login or Register
- Quick Links
- Live Chat
- Track Order
- Parts Availability
- RMA
- Help Center
- Contact Us
- Shop for
- Honda Parts
- Honda Accessories

My Garage
My Account
Cart
Genuine Honda Prelude Clutch Slave Cylinder
- Select Vehicle by Model
- Select Vehicle by VIN
Select Vehicle by Model
orMake
Model
Year
Select Vehicle by VIN
For the most accurate results, select vehicle by your VIN (Vehicle Identification Number).
3 Clutch Slave Cylinders found

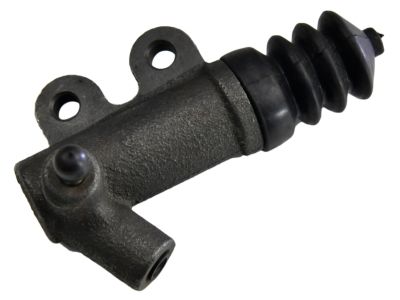
Honda Prelude Cylinder Assembly, Slave
Part Number: 46930-SM4-003$143.15 MSRP: $203.92You Save: $60.77 (30%)
Honda Prelude Clutch Slave Cylinder
The Clutch Slave Cylinder is an important component in Honda Prelude car model because it has to operate simultaneously with the Clutch Master Cylinder to release the clutch during pressing the pedal that is installed in the manual transmission system of a car. This hydraulic component takes force exerted from the driver then turns this force into hydraulic pressure whereby a certain rod is advanced forward and pushes on a lever or fork in order to shift gears safely. Since then, many models of the Honda Prelude, in particular this hydraulic mechanism is important for drivability, as well as the protection of the transmission. If there are some problems like bad feeling of the pedal, or leakage it is important to repair the problematic Clutch Slave Cylinder and make the car safe for usage.
In search of affordable OEM Honda Prelude Clutch Slave Cylinder? Consider browsing through our extensive inventory of genuine Honda Prelude Clutch Slave Cylinder. Not only do we provide market-leading prices and a manufacturer's warranty, but we also pride ourselves on exceptional customer service and swift delivery.
Honda Prelude Clutch Slave Cylinder Parts Questions & Experts Answers
- Q: How do you remove and install the slave cylinder in a clutch hydraulic system on Honda Prelude?A:To replace the clutch slave cylinder it is situated on the transaxle near the radiator and the following steps are taken. Remove the flare fitting with steel line from the clutch slave cylinder assembly by the removal of the attaching bolts and then detach the clutch slave cylinder from the clutch housing. In the case of installation the removal procedure needs to be reversed and only new DOT 3 or 4 brake fluid from a sealed container ought to be used to refill the clutch hydraulic system this should be followed by filling and bleeding the clutch system with the same brake fluid. When bleeding the hydraulic system, be certain to use DOT 3 or 4 brake fluid from a clean sealed container for the clutch master reservoir and if any is spilled, clean immediately to avoid thinning of the vehicle's paint. First, it is advisable to use a siphon, a turkey baster for the draining of old brake fluid; if you are unable to do this, you might have to remove the clutch master cylinder reservoir bracket and pour the fluid in a proper pitcher. If the reservoir was removed, put it back in and fill with fresh brake fluid up to the MAX. Open the drain cock and flush the inside of the reservoir well then place a flare or box end wrench on the clutch slave cylinder bleeder screw and connect one end of the rubber tube to it and let the other end dip in a clear drain container having brake fluid in it. Check that the clutch master cylinder is filled, then open the bleeder screw and get an assistant to depress the clutch pedal all the way down. When using the pedal, turn the bleed screw and when it is released let off the pedal and examine the fluid level of the reservoir and add when necessary. Perform these steps over until the bloody fluid that is coming out of the bleed screw is clear of foams and void of air bubbles and resupply the master clutch cylinder reservoir as required.
Related Honda Prelude Parts
Browse by Year
2001 Clutch Slave Cylinder 2000 Clutch Slave Cylinder 1999 Clutch Slave Cylinder 1998 Clutch Slave Cylinder 1997 Clutch Slave Cylinder 1996 Clutch Slave Cylinder 1995 Clutch Slave Cylinder 1994 Clutch Slave Cylinder 1993 Clutch Slave Cylinder 1992 Clutch Slave Cylinder 1991 Clutch Slave Cylinder 1990 Clutch Slave Cylinder 1989 Clutch Slave Cylinder 1988 Clutch Slave Cylinder 1982 Clutch Slave Cylinder 1981 Clutch Slave Cylinder 1980 Clutch Slave Cylinder 1979 Clutch Slave Cylinder


