Contact Us Live Chat or 1-888-984-2011
My Garage
My Account
Cart
Make sure this part fits

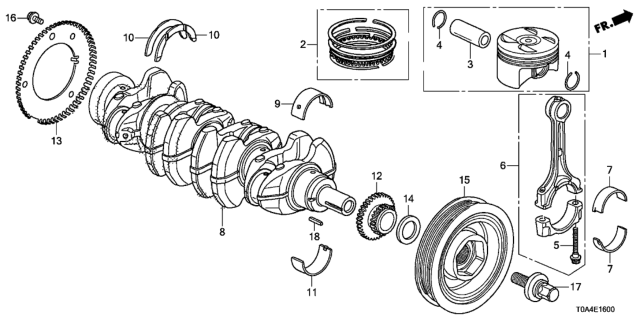
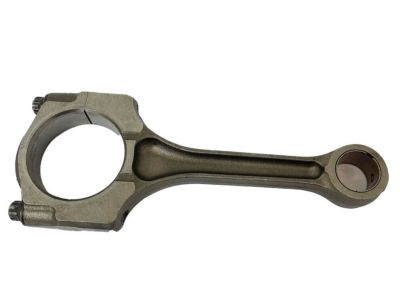
Honda 13210-R40-A00 Rod, Connecting

2008-2015 Honda 13210R40A00

Customer Questions & Expert Answers (5)
Honda 13210-R40-A00 Rod, Connecting
  • Part Description
    Connecting Rod
  • Replaces
    13210-RLF-S00
  • Manufacturer
    Honda
Make sure this part fits
$175.75 MSRP: $250.34
You Save: $74.59 (30%)
1
ADD TO CART
  • Related Parts
  • Product Specifications
  • Vehicle Fitment
  • Customer Questions & Expert Answers
  • Product Specifications

    BrandGenuine Honda
    Manufacturer Part Number13210-R40-A00
    Part DescriptionConnecting Rod
    Item Dimensions7.9 x 3.1 x 0.8 inches
    Item Weight1.80 Pounds
    ConditionNew
    Fitment TypeDirect Replacement
    Replaces13210-RLF-S00
    Require Quantity4
    ManufacturerHonda
    SKU13210-R40-A00
    WarrantyThis genuine Honda part is guaranteed by Honda's factory warranty.
    Shipping & ReturnShipping Policy Return Policy
    Warning: California’s Proposition 65
  • Vehicle Fitment

    Year Make Model Body & Trim Emission & Transmission
    2012 Honda Accord2 Door EX, 2 Door EX-L, 2 Door LX-S, 4 Door EX, 4 Door EX-L, 4 Door LX, 4 Door SEKA 5AT, KA 5MT, KL 5AT, KL 5MT
    2011 Honda Accord2 Door EX, 2 Door EX-L, 2 Door LX-S, 4 Door EX, 4 Door EX (PZEV), 4 Door EX-L, 4 Door EX-L (PZEV), 4 Door LX, 4 Door LX (PZEV), 4 Door SE, 4 Door SE (PZEV)KA 5AT, KA 5MT, KL 5AT, KL 5MT
    2010 Honda Accord2 Door EX, 2 Door EX-L, 2 Door LX-S, 4 Door EX, 4 Door EX (PZEV), 4 Door EX-L, 4 Door EX-L (PZEV), 4 Door LX, 4 Door LX (PZEV)KA 5AT, KA 5MT, KL 5AT, KL 5MT
    2009 Honda Accord2 Door EX, 2 Door EX-L, 2 Door LX-S, 4 Door EX, 4 Door EX (PZEV), 4 Door EX-L, 4 Door EX-L (PZEV), 4 Door LX, 4 Door LX (PZEV)KA 5AT, KA 5MT, KL 5AT, KL 5MT
    2008 Honda Accord2 Door EX, 2 Door EX-L, 2 Door LX, 4 Door EX, 4 Door EX (PZEV), 4 Door EX-L, 4 Door EX-L (PZEV), 4 Door LX, 4 Door LX (PZEV)KA 5AT, KA 5MT, KL 5AT, KL 5MT
    2014 Honda CR-V5 Door EX (2WD), 5 Door EX (AWD), 5 Door EX-L (2WD), 5 Door EX-L (AWD), 5 Door LX (2WD), 5 Door LX (AWD)KA 5AT
    2013 Honda CR-V5 Door EX (2WD), 5 Door EX (AWD), 5 Door EX-L (2WD), 5 Door EX-L (AWD), 5 Door LX (2WD), 5 Door LX (AWD)KA 5AT
    2012 Honda CR-V5 Door EX (2WD), 5 Door EX (AWD), 5 Door EX-L (2WD), 5 Door EX-L (AWD), 5 Door LX (2WD), 5 Door LX (AWD)KA 5AT
    2011 Honda CR-V5 Door EX (2WD), 5 Door EX (4WD), 5 Door EX-L (2WD), 5 Door EX-L (4WD), 5 Door LX (2WD), 5 Door LX (4WD), 5 Door SE (2WD), 5 Door SE (4WD)KA 5AT
    2010 Honda CR-V5 Door EX (2WD), 5 Door EX (4WD), 5 Door EX-L (2WD), 5 Door EX-L (4WD), 5 Door LX (2WD), 5 Door LX (4WD)KA 5AT
    View More
  • Customer Questions & Expert Answers

    Q:
    Does this fit my car? Posted by HondaPartsNow Specialist
    A:
    You can Select Your Vehicle to check if 13210-R40-A00 fits your vehicle.
    Posted by HondaPartsNow Specialist
    Q:
    What steps must be taken before removing the piston and connecting rod assemblies on Honda Crosstour? Posted by Customer
    A:
    Before the assemblies of pistons and connecting rods can be dismantled the cylinder head and oil pan have to be disconnected. First, look that whether there is ridge formation at the upper limit of ring travel in each cylinder, if so than this must be done by ridge reamer for avoiding piston breakage. Once the ridges are turned to the top turn the engine onto its side so the crankshaft is now at the top. After that, the connecting rod end-play has to be measured with the help of feeler gauges; it has to be within a given range; if it goes beyond this range, new connecting rods may be required. It is recommended to mark the connecting rods and caps to distinguish them before removing the connecting rod cap bolts and the cap itself, during which you should look for any traces of damage. Extract the connecting rod and piston assembly through the top of the engine and perform the same on all the cylinders. After removal, screw the connecting rod caps and setting geographical bearing inserts back into position and retain the old inserts especially for protection of surfaces. For piston ring installation, check the value of ring end gaps and then adjust the gaps to the recommended limits of the manufacturer. The oil control ring should be fitted first, before the middle and top rings with due regard to the nomenclature. If the piston and connecting rod assembly is to be installed into the cylinder, the innerliner of the cylinder should be polished and the edges should be chamfered. Do not lubricate the new bearing inserts as they are fitted and make sure that they sit in the correct position and that the piston ring gaps are arranged in the correct manner. Oil the piston and the rings, and then slip the piston/connecting rod into its corresponding cylinder avoiding to exert force on it. When the pistons have been installed, use Plastigage to determine the oil clearance of the connecting rod bearing and make sure that it is within the right provision. Where required, the bearing inserts should be replaced. Scrub off any Plastigage and lubricate the bearing surfaces; replace the rod cap and bolt it back down properly. Perform this for the other assemblies; one needs to make sure that they are properly cleaned and are well oriented. Last but not the least, turn the crankshaft in order to check for binding on bearings and to also measure for the connecting rod clearance if new con-rods and pins were fitted.
    Posted by HondaPartsNow Specialist
    Q:
    What steps must be taken before removing the piston and connecting rod assemblies on Honda CR-V? Posted by Customer
    A:
    Before the piston and connecting rod assemblies can be pulled out the cylinder head and oil pan must be pulled off. The first operation should be to look for any ridge at the upper limit of ring travel in each cylinder if any the ridge should be removed by the use of a ridge reamer so as not to cause the breaking of the piston. Finally after removing the ridges, fix the engine in such a way that the crank shaft is in up position. Using feeler gauges, it is necessary to check the connecting rod end play, which has to be in a certain range; if it is out of this range, new connecting rods may be needed. Paint the connecting rods and caps in order to differentiate between them, then remove the connecting rod cap screw and the cap where you will find the bearing insert, be careful not to drop it. Remove the connecting rod and piston assembly out through the top of the engines with a wooden dowel and perform the above in each cylinder. After that, screw the caps of the connecting rods and both bearing inserts back in, while retaining the old inserts for the purpose of preserving the surfaces. In piston ring installation ensure that the ring end gaps and the piston ring side clearance are in order. Place the rings on the pistons with the compression ring at the top then the scavenge ring above it and the oil control ring at the bottom. Before fitting of the piston and connecting rod clean the cylinder walls and give a edge cutting to it. The new bearing inserts are installed without any lubrication and it is posted up in the correct position with correct gap of the piston rings. Oil the piston as well as the rings before putting into the cylinder with the arrow situated at the front side of the engine. Some of the things that should be done include: examining the connecting rod bearing oil clearance by the aid of Plastigage while at the same time making sure that the surfaces where the checking is to be done have no oil on them. If the clearance is other than that specified, then check for bearing size and journal diameter. After confirming the clearance, the grease should be applied to the bearing faces, the new rod cap and bolts should be put back then tightened to the exact torque. Follow the same process for the other assemblies always making sure they are clean and are in the right orientation. Last but not the least; rotate the crankshaft with your fingers, thus check for binding or anything by way of ill-tolerance and also to measure the connecting rod end play to see whether it still fits the engine or not.
    Posted by HondaPartsNow Specialist
    Q:
    What should be done to identify the connecting rods and caps for the 2015 Honda Civic? Posted by Customer
    A:
    Mark the connecting rods and caps for identification.
    Posted by HondaPartsNow Specialist
    See expert answers on similar Connecting Rod
    Q:
    What is the procedure for removing the connecting rod cap for the 2006 Honda Accord? Posted by Customer
    A:
    Remove the connecting rod cap bolts and the cap itself, checking for any damage.
    Posted by HondaPartsNow Specialist
    See expert answers on similar Connecting Rod
    If you have any questions about this product, please don't hesitate to ask us. We will be happy to help you!

Genuine Honda Part 13210-R40-A00, the Right Choice

To ensure reliability, purchase Honda part # 13210-R40-A00 Rod, Connecting. It is sometimes referred to as Honda Connecting Rod. In terms of quality, OEM parts are the wise choice for Honda owners who want to keep their vehicles at peak performance. They are manufactured to follow official strict factory specifications and are made in world-class facilities. They undergo rigorous tests to ensure that they are durable and safe to use. This part fits 2008-2012 Honda Accord, 2010-2014 Honda CR-V, 2012-2015 Honda Civic, 2012-2015 Honda Crosstour.

HondaPartsNow.com is a leading supplier of genuine Honda parts and accessories such as Honda 13210R40A00 Rod, Connecting. When it comes to choosing the right parts for your vehicle, the solution is simple: shop from our wide selection of genuine Honda parts at competitive prices available on HondaPartsNow.com. We prioritize your convenience, 100% satisfaction, and peace of mind by offering a user-friendly catalog, manufacturer-warranted OEM Honda parts, a hassle-free return policy, and swift delivery service.

Why choose Honda Parts Now

  • Dedicated Service

    Your complete satisfaction is our #1 goal

  • Lowest Prices

    Best deals on genuine OE parts from dealerships

  • Fast Delivery

    Orders are processed and delivered promptly