Contact Us Live Chat or 1-888-984-2011
My Garage
My Account
Cart
Make sure this part fits

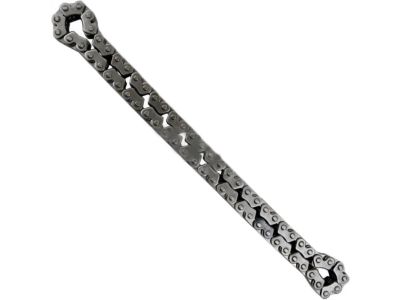
Honda 13441-R40-A01 Chain (62L)

2008-2015 Honda 13441R40A01

Customer Questions & Expert Answers (7)
Honda 13441-R40-A01 Chain (62L)
  • Part Description
    Chain
  • Manufacturer
    Honda
Make sure this part fits
$87.73 MSRP: $123.92
You Save: $36.19 (30%)
1
ADD TO CART
  • Related Parts
  • Product Specifications
  • Vehicle Fitment
  • Customer Questions & Expert Answers
  • Product Specifications

    BrandGenuine Honda
    Manufacturer Part Number13441-R40-A01
    Part DescriptionChain
    Item Dimensions2.4 x 2.4 x 0.4 inches
    Item Weight0.70 Pounds
    ConditionNew
    Fitment TypeDirect Replacement
    ManufacturerHonda
    SKU13441-R40-A01
    WarrantyThis genuine Honda part is guaranteed by Honda's factory warranty.
    Shipping & ReturnShipping Policy Return Policy
    Warning: California’s Proposition 65
  • Vehicle Fitment

    Year Make Model Body & Trim Emission & Transmission
    2012 Honda Accord2 Door EX, 2 Door EX-L, 2 Door LX-S, 4 Door EX, 4 Door EX-L, 4 Door LX, 4 Door SEKA 5AT, KA 5MT, KL 5AT, KL 5MT
    2011 Honda Accord2 Door EX, 2 Door EX-L, 2 Door LX-S, 4 Door EX, 4 Door EX (PZEV), 4 Door EX-L, 4 Door EX-L (PZEV), 4 Door LX, 4 Door LX (PZEV), 4 Door SE, 4 Door SE (PZEV)KA 5AT, KA 5MT, KL 5AT, KL 5MT
    2010 Honda Accord2 Door EX, 2 Door EX-L, 2 Door LX-S, 4 Door EX, 4 Door EX (PZEV), 4 Door EX-L, 4 Door EX-L (PZEV), 4 Door LX, 4 Door LX (PZEV)KA 5AT, KA 5MT, KL 5AT, KL 5MT
    2009 Honda Accord2 Door EX, 2 Door EX-L, 2 Door LX-S, 4 Door EX, 4 Door EX (PZEV), 4 Door EX-L, 4 Door EX-L (PZEV), 4 Door LX, 4 Door LX (PZEV)KA 5AT, KA 5MT, KL 5AT, KL 5MT
    2008 Honda Accord2 Door EX, 2 Door EX-L, 2 Door LX, 4 Door EX, 4 Door EX (PZEV), 4 Door EX-L, 4 Door EX-L (PZEV), 4 Door LX, 4 Door LX (PZEV)KA 5AT, KA 5MT, KL 5AT, KL 5MT
    2014 Honda CR-V5 Door EX (2WD), 5 Door EX (AWD), 5 Door EX-L (2WD), 5 Door EX-L (AWD), 5 Door LX (2WD), 5 Door LX (AWD)KA 5AT
    2013 Honda CR-V5 Door EX (2WD), 5 Door EX (AWD), 5 Door EX-L (2WD), 5 Door EX-L (AWD), 5 Door LX (2WD), 5 Door LX (AWD)KA 5AT
    2012 Honda CR-V5 Door EX (2WD), 5 Door EX (AWD), 5 Door EX-L (2WD), 5 Door EX-L (AWD), 5 Door LX (2WD), 5 Door LX (AWD)KA 5AT
    2011 Honda CR-V5 Door EX (2WD), 5 Door EX (4WD), 5 Door EX-L (2WD), 5 Door EX-L (4WD), 5 Door LX (2WD), 5 Door LX (4WD), 5 Door SE (2WD), 5 Door SE (4WD)KA 5AT
    2010 Honda CR-V5 Door EX (2WD), 5 Door EX (4WD), 5 Door EX-L (2WD), 5 Door EX-L (4WD), 5 Door LX (2WD), 5 Door LX (4WD)KA 5AT
    View More
  • Customer Questions & Expert Answers

    Q:
    Does this fit my car? Posted by HondaPartsNow Specialist
    A:
    You can Select Your Vehicle to check if 13441-R40-A01 fits your vehicle.
    Posted by HondaPartsNow Specialist
    Q:
    How do you remove and install the Timing Chain and Sprocket on Four cylinder engine on Honda Accord? Posted by Customer
    A:
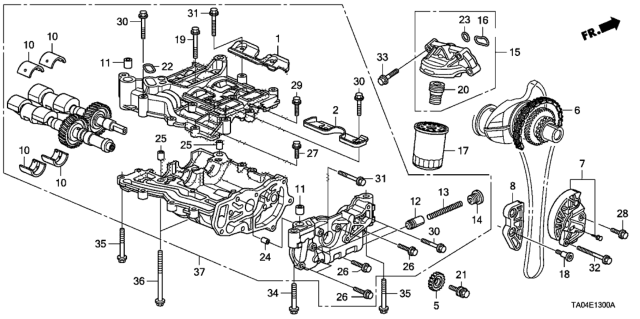
    To have access to the components one has to disconnect the cable on the negative terminal of the battery. Position the engine at Top Dead Centre for the number 1 cylinder, and then remove the valve cover along with the engine front cover. A small amount of rotation clockwise should be made in the crankshaft in order to screw into the holes a 0.05 inch (1.2 mm) pin and this will compress the chain tensioner, the other way round should be made in order to fix the pin. Then, dismantle all the bolts from the mounting and extract the timing chain tensioner and the upper timing chain guide between the camshaft sprockets and remove the camshaft timing chain guide, the tensioner arm, and the timing chain. For test or assembly, clean all parts by solvent and blow with compressed air free from oil, lubrication and dirt, then examine and check the chain tensioner for wear or damage and drain off any oil if refilling later. Inspect the timing chain guides, timing chain, and crankshaft and camshaft sprockets and replace any item that is suspect in its ability to provide long and worry-free service. During installation, if the crankshaft has been turned, be confident that the number one piston situated at the top dead centre with the timing mark situated in line with the pointer on the crankshaft sprocket. Place the chain alignment dots on the camshaft sprockets with the chain as follows; turn the sprockets until the alignment dots likes up. Fit the coloured link to the crank sprocket at full clockwise position and over the exhaust camshaft sprocket and the VTC actuator, such in a way that the dot is on the same colour of the chain link. Place the camshaft timing chain guide and the tensioner arm and tighten the bolts in the already mentioned torque limit;finally fit the timing chain tensioner and the upper timing chain guide and tighten the bolts in the already mentioned torque limit. Take out the pin in the timing chain tensioner, bolt on the valve cover and the engine front cover and rearrange the battery. Last, with the engine on, observe the presence of oil or coolant leaks.
    Posted by HondaPartsNow Specialist
    Q:
    How to remove and install a Timing Chain and Sprocket on 1.8L engine on Honda Civic? Posted by Customer
    A:
    The timing system is a bit complicated and one wrong move will result in rather intolerant and downright destructive behavior by the engine. This procedure should only be done by very experienced people and if in any doubt about ability an expert should be consulted. Reverify all jobs in order to be assured of correctness before switch on the engine. Starting with the cable, it is necessary to remove it from the negative terminal of the battery in addition to the lower splash shields. Take the TDC number 1 position for the engine and then disconnect the valve cover and the timing chain cover. Turn the crankshaft slightly anti-clockwise to compress the chain tensioner, insert a 0.040 inch pin into the alignment holes and turn the crankshaft slightly clockwise to lock the pin; also ensure the marking on the crankshaft sprocket aligns with the one on the engine block. Check the tensioner rod length; if found to be in excess of 0.571 inch the timing chain should be replaced. Undo the timing chain sprocket mounting bolts as well as the timing chain tensioner; afterwards, also undo the cam chain guide and the camshaft chain tensioner arm; and finally, the timing chain. It will not be safe to rotate the crankshaft or camshaft after the timing chain has been pulled out. Wipe all the parts with solvent and blow with compressed air; visually check the chain tensioner, timing chain guides, timing chain and sprockets for wear or damage and renew them if doubtful. Make sure the timing mark on the crank shaft sprocket is lined up with the 'TDC' mark and the 'UP' mark on the cam shaft sprocket is on top of the cylinder head with index marks on it at the top edge. Slide the timing chain over the crank sprocket positioning the plated link over the dot on the sprocket, place the timing chain over the camshaft sprocket positioning the chain dot on a coloured chain link. Dex: camshaft timing chain guide and tensioner arm, the bolts to the specified torque and the timing chain tensioner. Pull the pin out in the tensioner at this time and make sure that the mark on the sprocket is facing up at 12 o'clock position, and the other two lines on camshaft sprocket atop the cylinder head. With the slow speed rotate the crankshaft at least two revolutions towards clockwise and realign the timing marks along with the index marks of the camshaft sprocket. If the crankshaft binds, do not force it because that will only be an indication of improper valve timing; take off the chain and then reinstall it. Last, fit valve cover and timing chain cover, while other procedures are the inverse of the removal procedure reinstall the battery, start and check for any signs of leakage.
    Posted by HondaPartsNow Specialist
    Q:
    What specific steps should be taken for the 2013 Honda CR-V? Posted by Customer
    A:
    For 2015 and later CR-V models, remove the high-pressure fuel pump, followed by the valve cover and the timing chain cover.
    Posted by HondaPartsNow Specialist
    Q:
    What covers need to be removed for the 2014 Honda Crosstour? Posted by Customer
    A:
    Remove the valve cover and the engine front cover.
    Posted by HondaPartsNow Specialist
    See expert answers on similar Timing Chain
    Q:
    What should be done before starting the engine for the 2014 Honda Civic? Posted by Customer
    A:
    Carefully rotate the crankshaft by hand through at least two full revolutions. If any resistance is felt, stop immediately as there may be an issue with valve contact.
    Posted by HondaPartsNow Specialist
    Q:
    What should be done before starting the engine for the 2016 Honda CR-V? Posted by Customer
    A:
    Double-check all work to ensure correctness before starting the engine.
    Posted by HondaPartsNow Specialist
    See expert answers on similar Timing Chain
    If you have any questions about this product, please don't hesitate to ask us. We will be happy to help you!

Genuine Honda Part 13441-R40-A01, the Right Choice

Your vehicle deserves only genuine OEM Honda parts and accessories. To ensure reliability, purchase Honda part # 13441-R40-A01 Chain (62L). It is sometimes referred to as Honda Timing Chain. Our Honda parts and accessories are expedited directly from authorized Honda dealers strategically located all across the U.S. and are backed by the manufacturer's 12 month, 12,000 mile warranty. OEM Honda parts are the best for restoring your vehicle to factory condition performance. This part fits 2008-2012 Honda Accord, 2010-2014 Honda CR-V, 2012-2015 Honda Civic, 2012-2015 Honda Crosstour.

Affordable, reliable and built to last, Honda part # 13441R40A01 Chain (62L) stands out as the smart option. HondaPartsNow.com is your prime online source with the biggest and best selection of genuine Honda parts and accessories at giant discounted prices. We have the OEM Honda parts and accessories you need at the wholesale prices. HondaPartsNow.com has you covered no matter what type of Honda vehicle you drive.

Why choose Honda Parts Now

  • Dedicated Service

    Your complete satisfaction is our #1 goal

  • Lowest Prices

    Best deals on genuine OE parts from dealerships

  • Fast Delivery

    Orders are processed and delivered promptly