Contact Us Live Chat or 1-888-984-2011
My Garage
My Account
Cart
Make sure this part fits

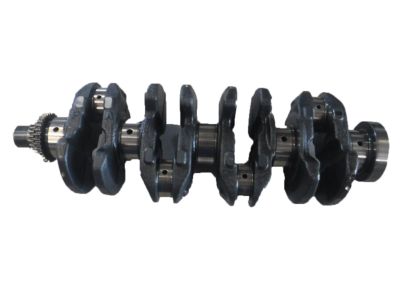
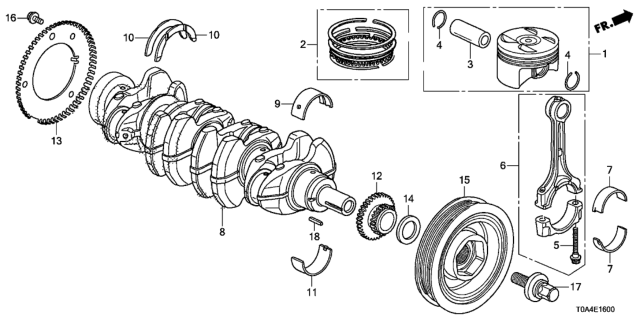
Honda 13310-R40-A00 Crankshaft

2002-2015 Honda 13310R40A00

Customer Questions & Expert Answers (5)
Honda 13310-R40-A00 Crankshaft
  • Part Description
    Crankshaft
  • Replaces
    13310-PPA-000
  • Manufacturer
    Honda
Make sure this part fits
$439.51 MSRP: $585.43
You Save: $145.92 (25%)
1
ADD TO CART
  • Related Parts
  • Product Specifications
  • Vehicle Fitment
  • Customer Questions & Expert Answers
  • Product Specifications

    BrandGenuine Honda
    Manufacturer Part Number13310-R40-A00
    Part DescriptionCrankshaft
    Item Dimensions24.0 x 6.0 x 6.0 inches
    Item Weight44.40 Pounds
    ConditionNew
    Fitment TypeDirect Replacement
    Replaces13310-PPA-000
    ManufacturerHonda
    SKU13310-R40-A00
    WarrantyThis genuine Honda part is guaranteed by Honda's factory warranty.
    Shipping & ReturnShipping Policy Return Policy
    Warning: California’s Proposition 65
  • Vehicle Fitment

    Year Make Model Body & Trim Emission & Transmission
    2012 Honda Accord2 Door EX, 2 Door EX-L, 2 Door LX-S, 4 Door EX, 4 Door EX-L, 4 Door LX, 4 Door SEKA 5AT, KA 5MT, KL 5AT, KL 5MT
    2011 Honda Accord2 Door EX, 2 Door EX-L, 2 Door LX-S, 4 Door EX, 4 Door EX (PZEV), 4 Door EX-L, 4 Door EX-L (PZEV), 4 Door LX, 4 Door LX (PZEV), 4 Door SE, 4 Door SE (PZEV)KA 5AT, KA 5MT, KL 5AT, KL 5MT
    2010 Honda Accord2 Door EX, 2 Door EX-L, 2 Door LX-S, 4 Door EX, 4 Door EX (PZEV), 4 Door EX-L, 4 Door EX-L (PZEV), 4 Door LX, 4 Door LX (PZEV)KA 5AT, KA 5MT, KL 5AT, KL 5MT
    2009 Honda Accord2 Door EX, 2 Door EX-L, 2 Door LX-S, 4 Door EX, 4 Door EX (PZEV), 4 Door EX-L, 4 Door EX-L (PZEV), 4 Door LX, 4 Door LX (PZEV)KA 5AT, KA 5MT, KL 5AT, KL 5MT
    2008 Honda Accord2 Door EX, 2 Door EX-L, 2 Door LX, 4 Door EX, 4 Door EX (PZEV), 4 Door EX-L, 4 Door EX-L (PZEV), 4 Door LX, 4 Door LX (PZEV)KA 5AT, KA 5MT, KL 5AT, KL 5MT
    2007 Honda Accord2 Door EX, 2 Door EX-L, 2 Door EX-SUL, 2 Door LX, 2 Door LX-SUL, 4 Door EX, 4 Door EX-L, 4 Door LX, 4 Door SE, 4 Door VPKA 5AT, KA 5MT, KL 5AT
    2006 Honda Accord2 Door EX, 2 Door EX-L, 2 Door LX, 4 Door EX, 4 Door EX-L, 4 Door LX, 4 Door SE, 4 Door VPKA 5AT, KA 5MT, KL 5AT
    2005 Honda Accord2 Door EX, 2 Door EX-L, 2 Door LX, 2 Door SE, 4 Door DX, 4 Door EX, 4 Door EX-L, 4 Door LXKA 5AT, KA 5MT, KL 5AT, KL 5MT
    2004 Honda Accord2 Door EX, 2 Door EX-L, 2 Door LX, 4 Door DX, 4 Door EX, 4 Door EX-L, 4 Door LXKA 5AT, KA 5MT, KL 5AT
    2003 Honda Accord2 Door EX, 2 Door EX-L, 2 Door LX, 4 Door DX, 4 Door EX, 4 Door EX-L, 4 Door LXKA 5AT, KA 5MT, KL 5AT
    View More
  • Customer Questions & Expert Answers

    Q:
    Does this fit my car? Posted by HondaPartsNow Specialist
    A:
    You can Select Your Vehicle to check if 13310-R40-A00 fits your vehicle.
    Posted by HondaPartsNow Specialist
    Q:
    How can the crankshaft be removed and installed on Honda Civic? Posted by Customer
    A:
    The crankshaft can only be removed, if the engine has been removed from the vehicle, assuming that parts such as the flywheel, crankshaft pulley, timing chain, oil pan and others have been unbolted. Use a dial indicator to check crankshaft end play; the zero should read with crankshaft pried to rear, then measure when pried to front of the thrust; common end play includes a range between 0.004 and 0.014 inch. In the situation where a dial indicator cannot be used, feeler gauges are used to measure clearance. Turn the main bearing bridge perimeter bolts out slowly if present, take off the bridge if present and carefully lift out the crankshaft simultaneously taking off the crankshaft position sensor pulse plate. For installation, the engine block and crankshaft must be clean and inspected, Afterwards turn the block upside down and pull out the lower crankcase. Lubricate and scrape out old bearing metal and renew the upper main bearing inserts and check that the oil holes are correctly located. Ensure that the oil clearance of the main bearing is correct by the method of Plastigage, fit the lower crankcase or caps and without dismantling the Plastigage use a torque wrench to tighten the bolts in the right sequences. In the case of assessing the clearance, if it varies with the standard figures, incorrect bearing sizes or interference by dirt may be thought of. Wipe any Plastigage remaining on the crankshaft before reassemble and there's applying the layer of oil on the bearing surface and make sure the mating surfaces have no oil. Spread liquid gasket on the lower main bearing bridge and fasten it as soon as possible; the bolts of the liquid gasket should be tightened to a fixed torque. Crankshaft end play must be checked and felt to rotate as smoothly with little friction as possible. Last of all fit the new rear main oil seal and do not turn the engine for some time before filling it with oil or cranking it to start the car.
    Posted by HondaPartsNow Specialist
    Q:
    How can the crankshaft be removed and installed on Honda Crosstour? Posted by Customer
    A:
    If again, we take off the flywheel, crankshaft pulley, timing belt or chain, oilpan, oil pump body, oil filter and piston/conrod assemblies then the crankshaft can only be removed when the whole engine has been piped out from the car. In V6 engines, the rear main oil seal retainer is to be removed from the block before the crankshaft can be removed. First, to check the crankshaft endfloat, fix a dial indicator on the flange of the crank and take its Zero reading. Turn the crankshaft to the right and set the indicator on 0, after that turn the crankshaft to the left and read the figures which should be around 0.003 to 0.010 inch. If a dial indicator is not available then clearance can also be measured with the use of feeler gauges. Turn and untighten the main bearing assembly bolts slowly until you can by hand remove the main bearing assembly or caps, but you have to be very careful not to drop the bearing inserts. Remove the crankshaft from the engine and it might be a bit hard due to its large size and probably weight. As for fastening, make certain the engine block and crankshaft are free from debris and were checked for their conditions. Place the engine block in an upside-down fashion, and if there are any inserts in the bearings, they should then be withdrawn, and the bearing areas should be cleaned. New upper main bearing inserts should be put in the engine block, and parallel to the oil holes; the thrust washer must be fitted properly. Clean the lower main bearing inserts and fit them into main bearing assembly's or caps, and should not tap to fit. Once you have gotten to clean the crankshaft, you need to place it in its proper place, to measure the main bearing oil clearance you need to use Plastigage. The lower crankcase or caps should be installed, but do not rotate them in order to not compress the Plastigage; however, tighten the bolts in the specified order. Delete the bolts and measure the Plastigage to ascertain the oil clearance; no dirt or oil must have affected the reading. If clearance is incorrect than measure the bearing insert sizes and observe the crank journal for any taper. Erase any Plastigage deposit on the journals and insert faces. For final positioning increase and remove it, then grease or apply assembly lube in the bearing areas and make certain that the crankshaft journals are clean before replacing the crankshaft. Lubricate the bearing insert faces and fit the lower main bearing bridge, using a torque wrench to restore all the bolts. Check the crankshaft end play once again and manipulate the crank shaft to and fro and make sure it glides freely, if not correct it. Last, fit in the new rear main oil seal into place.
    Posted by HondaPartsNow Specialist
    Q:
    How can the crankshaft be removed and installed on Honda CR-V? Posted by Customer
    A:
    The crankshaft can only be removed, if the engine has been removed from the vehicle, assuming that parts such as the flywheel, crankshaft pulley, timing chain, oil pan and others have been unbolted. Use a dial indicator to check crankshaft end play; the zero should read with crankshaft pried to rear, then measure when pried to front of the thrust; common end play includes a range between 0.004 and 0.014 inch. In the situation where a dial indicator cannot be used, feeler gauges are used to measure clearance. Turn the main bearing bridge perimeter bolts out slowly if present, take off the bridge if present and carefully lift out the crankshaft simultaneously taking off the crankshaft position sensor pulse plate. For installation, the engine block and crankshaft must be clean and inspected, Afterwards turn the block upside down and pull out the lower crankcase. Lubricate and scrape out old bearing metal and renew the upper main bearing inserts and check that the oil holes are correctly located. Ensure that the oil clearance of the main bearing is correct by the method of Plastigage, fit the lower crankcase or caps and without dismantling the Plastigage use a torque wrench to tighten the bolts in the right sequences. In the case of assessing the clearance, if it varies with the standard figures, incorrect bearing sizes or interference by dirt may be thought of. Wipe any Plastigage remaining on the crankshaft before reassemble and there's applying the layer of oil on the bearing surface and make sure the mating surfaces have no oil. Spread liquid gasket on the lower main bearing bridge and fasten it as soon as possible; the bolts of the liquid gasket should be tightened to a fixed torque. Crankshaft end play must be checked and felt to rotate as smoothly with little friction as possible. Last of all fit the new rear main oil seal and do not turn the engine for some time before filling it with oil or cranking it to start the car.
    Posted by HondaPartsNow Specialist
    Q:
    How can the crankshaft be removed and installed on Honda Accord? Posted by Customer
    A:
    If again, we take off the flywheel, crankshaft pulley, timing belt or chain, oilpan, oil pump body, oil filter and piston/conrod assemblies then the crankshaft can only be removed when the whole engine has been piped out from the car. In V6 engines, the rear main oil seal retainer is to be removed from the block before the crankshaft can be removed. First, to check the crankshaft endfloat, fix a dial indicator on the flange of the crank and take its Zero reading. Turn the crankshaft to the right and set the indicator on 0, after that turn the crankshaft to the left and read the figures which should be around 0.003 to 0.010 inch. If a dial indicator is not available then clearance can also be measured with the use of feeler gauges. Turn and untighten the main bearing assembly bolts slowly until you can by hand remove the main bearing assembly or caps, but you have to be very careful not to drop the bearing inserts. Remove the crankshaft from the engine and it might be a bit hard due to its large size and probably weight. As for fastening, make certain the engine block and crankshaft are free from debris and were checked for their conditions. Place the engine block in an upside-down fashion, and if there are any inserts in the bearings, they should then be withdrawn, and the bearing areas should be cleaned. New upper main bearing inserts should be put in the engine block, and parallel to the oil holes; the thrust washer must be fitted properly. Clean the lower main bearing inserts and fit them into main bearing assembly's or caps, and should not tap to fit. Once you have gotten to clean the crankshaft, you need to place it in its proper place, to measure the main bearing oil clearance you need to use Plastigage. The lower crankcase or caps should be installed, but do not rotate them in order to not compress the Plastigage; however, tighten the bolts in the specified order. Delete the bolts and measure the Plastigage to ascertain the oil clearance; no dirt or oil must have affected the reading. If clearance is incorrect than measure the bearing insert sizes and observe the crank journal for any taper. Erase any Plastigage deposit on the journals and insert faces. For final positioning increase and remove it, then grease or apply assembly lube in the bearing areas and make certain that the crankshaft journals are clean before replacing the crankshaft. Lubricate the bearing insert faces and fit the lower main bearing bridge, using a torque wrench to restore all the bolts. Check the crankshaft end play once again and manipulate the crank shaft to and fro and make sure it glides freely, if not correct it. Last, fit in the new rear main oil seal into place.
    Posted by HondaPartsNow Specialist
    If you have any questions about this product, please don't hesitate to ask us. We will be happy to help you!

Genuine Honda Part 13310-R40-A00, the Right Choice

Your vehicle deserves only genuine OEM Honda parts and accessories. To ensure reliability, purchase Honda part # 13310-R40-A00 Crankshaft. It is sometimes referred to as Honda Crankshaft. Our Honda parts and accessories are expedited directly from authorized Honda dealers strategically located all across the U.S. and are backed by the manufacturer's 12 month, 12,000 mile warranty. OEM Honda parts are the best for restoring your vehicle to factory condition performance. This part fits 2003-2012 Honda Accord, 2002-2014 Honda CR-V, 2012-2015 Honda Civic, 2003-2011 Honda Element.

Affordable, reliable and built to last, Honda part # 13310R40A00 Crankshaft stands out as the smart option. HondaPartsNow.com is your prime online source with the biggest and best selection of genuine Honda parts and accessories at giant discounted prices. We have the OEM Honda parts and accessories you need at the wholesale prices. HondaPartsNow.com has you covered no matter what type of Honda vehicle you drive.

Why choose Honda Parts Now

  • Dedicated Service

    Your complete satisfaction is our #1 goal

  • Lowest Prices

    Best deals on genuine OE parts from dealerships

  • Fast Delivery

    Orders are processed and delivered promptly