Contact Us Live Chat or 1-888-984-2011
My Garage
My Account
Cart
Make sure this part fits

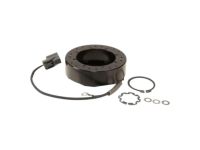
Honda 38810-P8F-A01 Compressor (Denso)

1999-2004 Honda 38810P8FA01

Customer Questions & Expert Answers (4)
Honda 38810-P8F-A01 Compressor (Denso)
  • Part Description
    Compressor
  • Manufacturer
    Honda
Make sure this part fits
$853.51 MSRP: $1231.62
You Save: $378.11 (31%)
1
ADD TO CART
  • Related Parts
  • Product Specifications
  • Vehicle Fitment
  • Customer Questions & Expert Answers
  • Product Specifications

    BrandGenuine Honda
    Manufacturer Part Number38810-P8F-A01
    Part DescriptionCompressor
    Other NamesCompressor Assembly
    Item Dimensions11.0 x 9.5 x 8.0 inches
    Item Weight10.60 Pounds
    ConditionNew
    Fitment TypeDirect Replacement
    ManufacturerHonda
    SKU38810-P8F-A01
    WarrantyThis genuine Honda part is guaranteed by Honda's factory warranty.
    Shipping & ReturnShipping Policy Return Policy
    Warning: California’s Proposition 65
  • Vehicle Fitment

    Year Make Model Body & Trim Emission & Transmission
    2004 Honda Odyssey5 Door EX, 5 Door EX-L, 5 Door LXKA 5AT
    2003 Honda Odyssey5 Door EX, 5 Door EX-L, 5 Door LXKA 5AT
    2002 Honda Odyssey5 Door EX, 5 Door EX-L, 5 Door LX, 5 Door VANKA 5AT
    2001 Honda Odyssey5 Door EX, 5 Door LX, 5 Door VANKA 4AT
    2000 Honda Odyssey5 Door EX, 5 Door LX, 5 Door VANKA 4AT
    1999 Honda Odyssey5 Door EX, 5 Door LX, 5 Door VANKA 4AT
    2004 Honda Pilot5 Door EX, 5 Door EX-L, 5 Door LXKA 5AT, KL 5AT
    2003 Honda Pilot5 Door EX, 5 Door EX-L, 5 Door LXKA 5AT, KL 5AT
  • Customer Questions & Expert Answers

    Q:
    I would like to make sure that this is the correct fit for my car Posted by HondaPartsNow Specialist
    A:
    You can Select Your Vehicle to check if 38810-P8F-A01 fits your vehicle.
    Posted by HondaPartsNow Specialist
    Q:
    How to remove A/C Compressor on Honda Odyssey? Posted by Customer
    A:
    The receiver-drier should be replaced whenever the compressor is replaced. To remove it, first have the air conditioning system refrigerant discharged and recovered by an air conditioning technician. Then, disconnect the cable from the negative battery terminal. Remove the drivebelt. On 2004 and earlier models, remove the alternator. Set the parking brake, block the rear wheels and raise the front of the vehicle, supporting it securely on jackstands. Remove the splash shield from under the engine compartment. On 2005 and later models detach the front of the inner fender and move it rearward. Disconnect the compressor clutch wiring harness. Disconnect the refrigerant lines from the compressor. Plug the open fittings to prevent entry of dirt and moisture. Remove the subframe bracket bolts, loosen the subframe mounting bolt and pivot the bracket away from the body. Remove the compressor mounting bolts. Carefully guide the compressor through the opening between the subframe and the body of the vehicle. If necessary, remove the compressor mounting bracket. Remove the compressor bracket from the engine compartment. To install, the clutch may have to be transferred from the old compressor to the new unit. Adjust the amount of refrigerant oil in the new compressor using the following calculations: Drain the refrigerant oil from the old compressor through the suction fitting and measure it in ounces. Subtract this number from 7 ounces (210 ml). The difference between these two figures is equal to the amount you should drain from the new compressor. Installation is the reverse of removal, using new 0-rings where the line fittings attach to the compressor. Tighten the subframe bracket bolts and subframe mounting bolt. Reconnect the battery. Have the system evacuated, recharged and leak tested by the shop that discharged it.
    Posted by HondaPartsNow Specialist
    Q:
    How do you remove and install the A/C Compressor on Honda Pilot? Posted by Customer
    A:
    The receiver-drier should be replaced whenever the compressor is replaced. To remove the compressor, first have the air conditioning system refrigerant discharged and recovered by an air conditioning technician. If the compressor is being removed for reasons other than replacement and is working, turn it on for a few minutes on your way to the location that is going to discharge the system. Next, disconnect the cable from the negative battery terminal. Remove the drivebelt. Set the parking brake, block the rear wheels and raise the front of the vehicle, supporting it securely on jackstands. Remove the splash shield from under the engine compartment. Disconnect the wiring harness electrical connector for the compressor clutch. On 2007 Acura MDX models, the connector is mounted to the compressor on the end opposite from the pulley. On all other models, it's mounted on the fan shroud assembly in front of the alternator. Simply follow the wires from the compressor to find the connector. Support the right-side of the subframe with a floor jack, then remove the subframe bracket located below the compressor. The manufacturer recommends that the subframe mounting bolt be replaced with a new one upon installation of the subframe bracket. Disconnect the refrigerant lines from the compressor. Plug the open fittings to prevent the entry of dirt and moisture. Remove the compressor mounting bolts. Remove the compressor. The compressor mounting bracket mounting bolts are now accessible and the bracket can easily be removed if necessary. The lower alternator mounting bolt must be removed first. To install the compressor, the clutch may have to be transferred from the old compressor to the new unit. If a new or rebuilt compressor is being installed, follow the accompanying directions to properly adjust the oil level before installing it. Installation is the reverse of removal, using new 0-rings where the line fittings attach to the compressor. Tighten the subframe bracket bolts and subframe mounting bolt. Reconnect the battery. Have the system evacuated, recharged and leak tested by the shop that discharged it.
    Posted by HondaPartsNow Specialist
    Q:
    I want to buy this part but i want to knor if it comes with the clutch set and startor set. Posted by Customer: 2002 Honda Odyssey
    A:
    No it does not, those are part number 38924-P8F-A01 stator and clutch 38900-P8F-A01
    Posted by HondaPartsNow Specialist 16/1/2017
    If you have any questions about this product, please don't hesitate to ask us. We will be happy to help you!

Genuine Honda Part 38810-P8F-A01, the Right Choice

To ensure reliability, purchase Honda part # 38810-P8F-A01 Compressor (Denso). It is sometimes referred to as Honda A/C Compressor. In terms of quality, OEM parts are the wise choice for Honda owners who want to keep their vehicles at peak performance. They are manufactured to follow official strict factory specifications and are made in world-class facilities. They undergo rigorous tests to ensure that they are durable and safe to use. This part fits 1999-2004 Honda Odyssey, 2003-2004 Honda Pilot.

HondaPartsNow.com is a leading supplier of genuine Honda parts and accessories such as Honda 38810P8FA01 Compressor (Denso). When it comes to choosing the right parts for your vehicle, the solution is simple: shop from our wide selection of genuine Honda parts at competitive prices available on HondaPartsNow.com. We prioritize your convenience, 100% satisfaction, and peace of mind by offering a user-friendly catalog, manufacturer-warranted OEM Honda parts, a hassle-free return policy, and swift delivery service.

Why choose Honda Parts Now

  • Dedicated Service

    Your complete satisfaction is our #1 goal

  • Lowest Prices

    Best deals on genuine OE parts from dealerships

  • Fast Delivery

    Orders are processed and delivered promptly