×
- Hello
- Login or Register
- Quick Links
- Live Chat
- Track Order
- Parts Availability
- RMA
- Help Center
- Contact Us
- Shop for
- Honda Parts
- Honda Accessories

My Garage
My Account
Cart
Genuine Honda Accord Brake Shoe Set
Brake Shoe- Select Vehicle by Model
- Select Vehicle by VIN
Select Vehicle by Model
orMake
Model
Year
Select Vehicle by VIN
For the most accurate results, select vehicle by your VIN (Vehicle Identification Number).
11 Brake Shoe Sets found

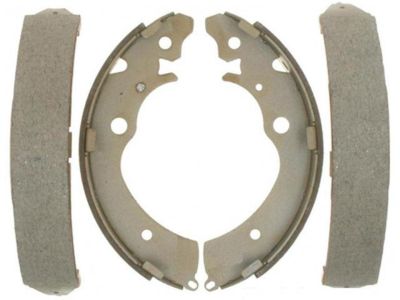
Honda Accord Shoe Set, Rear Brake
Part Number: 43053-SM4-A01$114.24 MSRP: $161.35You Save: $47.11 (30%)
Honda Accord Shoe, Rear Brake (A)
Part Number: 43153-SM4-A01$22.93 MSRP: $32.38You Save: $9.45 (30%)
Honda Accord Brake Shoe Set
The Brake Shoe Set found in Honda Accord vehicles are mainly involved in the drum brake more especially in coming up with the friction required to stop the car. When the brake is on, the brake shoe forces the lining to rub the interior of the drum and this rubbers cause the energy of the Accord to decrease through conversion to heat energy. Drum brakes as a braking system are not popular as disc brakes since the latter has better efficiency and cooling factors though drum brakes are cheap especially for car models where they are used at the rear. In the process of blending the above-listed features, multiple styles of Brake Shoe Sets were used by Honda in Accord with penchant for entry-level trims. These brake shoes often have longer service life than the disc brakes, can serve two to three times longer than before before they are changed. Nonetheless, similar to any other Mechanical Braided Brake Hose and Steel Pipe products, the Brake Shoe Set will not stay as a permanent solution, this is because brake operation comes along with friction actions that lead to the exhaustion or deterioration of the said set; therefore, it becomes advisable to replace the product on regular intervals for the proper functioning of the Honda Accord Vehicles.
In search of affordable OEM Honda Accord Brake Shoe Set? Consider browsing through our extensive inventory of genuine Honda Accord Brake Shoe Set. Not only do we provide market-leading prices and a manufacturer's warranty, but we also pride ourselves on exceptional customer service and swift delivery.
Honda Accord Brake Shoe Set Parts Questions & Experts Answers
- Q: How to replace brake shoes and springs for the Honda Accord?A:Whenever the brake shoes are replaced, the return and hold-down springs should also be replaced. Due to the continuous heating/cooling cycle the springs are subjected to, they can lose tension over a period of time and may allow the shoes to drag on the drum and wear at a much faster rate than normal. Loosen the wheel lug nuts, raise the rear of the vehicle and support it securely on jackstands. Block the front wheels to keep the vehicle from rolling. Remove the rear wheels. Release the parking brake. Remove the brake drum. It should simply pull straight off the hub. If the drum won't come off, tap it carefully with a soft-faced mallet, or screw a couple of 8.0 mm bolls into the tapped holes. If it still won't budge, the shoes have probably carved wear grooves into the drum. To get the drum off, you'll have to retract them. Remove the rubber plug in the backing plate. Use one screw-driver inserted through the hole in the backing plate to hold the self-adjuster lever away from the adjuster star wheel, then use another screwdriver to rotate the star wheel until the drum can be removed. Replacing the shoes is a lot easier if you remove the rear wheel bearing cap, spindle nut and washer, and slide off the hub unit. All four rear brake shoes must be replaced at the same time, but to avoid mixing up parts, work on only one brake assembly at a time. Before reinstalling the drum it should be checked for cracks, score marks, deep scratches and hard spots, which will appear as small discolored areas. If the hard spots cannot be removed with fine emery cloth or if any or the other conditions listed above exist, the drum must be taken to an automotive machine shop to have it machined. Note: Professionals recommend resurfacing the drums whenever a brake job is done. Resurfacing will eliminate the possibility of out-of-round drums. If the drums are worn so much that they can't be resurfaced without exceeding the maximum allowable diameter (stamped into the drum), then new ones will be required. At the very least, if you elect not to have the drums resurfaced, remove the glazing from the surface with sandpaper or emery cloth using a swirling motion. Install the hub and bearing unit, the washer and a new spindle nut if removed previously. Tighten the nut. Install the brake drum.
Related Honda Accord Parts
Browse by Year
2007 Brake Shoe Set 2006 Brake Shoe Set 2005 Brake Shoe Set 2004 Brake Shoe Set 2003 Brake Shoe Set 2002 Brake Shoe Set 2001 Brake Shoe Set 2000 Brake Shoe Set 1999 Brake Shoe Set 1998 Brake Shoe Set 1997 Brake Shoe Set 1996 Brake Shoe Set 1995 Brake Shoe Set 1994 Brake Shoe Set 1993 Brake Shoe Set 1992 Brake Shoe Set 1991 Brake Shoe Set 1990 Brake Shoe Set 1989 Brake Shoe Set 1988 Brake Shoe Set 1987 Brake Shoe Set 1986 Brake Shoe Set 1985 Brake Shoe Set 1984 Brake Shoe Set 1983 Brake Shoe Set 1982 Brake Shoe Set 1981 Brake Shoe Set 1980 Brake Shoe Set 1979 Brake Shoe Set 1978 Brake Shoe Set 1977 Brake Shoe Set 1976 Brake Shoe Set


