Contact Us Live Chat or 1-888-984-2011
My Garage
My Account
Cart
Make sure this part fits

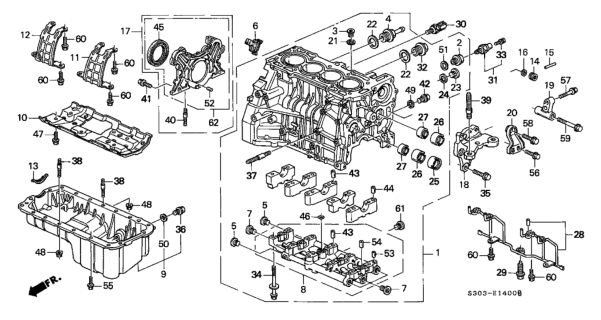
Honda 11200-P5K-010 Pan, Oil

1997-2001 Honda Prelude 11200P5K010

Customer Questions & Expert Answers (3)
Honda 11200-P5K-010 Pan, Oil
  • Part Description
    Oil Pan
  • Replaces
    11200-P5K-000
  • Manufacturer
    Honda
  • Manufacturer's Notes
    This part is discontinued.
Make sure this part fits
$429.64 MSRP: $619.97
You Save: $190.33 (31%)
Currently Unavailable

Due to manufacturer supply shortage, this item isn’t currently available for ordering.

  • Related Parts
  • Product Specifications
  • Vehicle Fitment
  • Customer Questions & Expert Answers
  • Product Specifications

    BrandGenuine Honda
    Manufacturer Part Number11200-P5K-010
    Part DescriptionOil Pan
    Item Dimensions19.4 x 13.3 x 6.8 inches
    Item Weight8.60 Pounds
    ConditionNew
    Fitment TypeDirect Replacement
    Replaces11200-P5K-000
    ManufacturerHonda
    SKU11200-P5K-010
    WarrantyThis genuine Honda part is guaranteed by Honda's factory warranty.
    Shipping & ReturnShipping Policy Return Policy
    Warning: California’s Proposition 65
  • Vehicle Fitment

    Year Make Model Body & Trim Emission & Transmission
    2001 Honda Prelude2 Door Base, 2 Door TYPESHKA 4AT, KA 5MT
    2000 Honda Prelude2 Door Base, 2 Door TYPESHKA 4AT, KA 5MT
    1999 Honda Prelude2 Door Base, 2 Door TYPESHKA 4AT, KA 5MT
    1998 Honda Prelude2 Door Base, 2 Door TYPESHKA 4AT, KA 5MT
    1997 Honda Prelude2 Door Base, 2 Door TYPESHKA 4AT, KA 5MT, KL 4AT, KL 5MT
  • Customer Questions & Expert Answers

    Q:
    Does this fit my car? Posted by HondaPartsNow Specialist
    A:
    You can Select Your Vehicle to check if 11200-P5K-010 fits your vehicle.
    Posted by HondaPartsNow Specialist
    Q:
    How do you remove and install the oil pan on Honda Prelude? Posted by Customer
    A:
    To remove and install the oil pan, begin by disconnecting the negative battery cable and safely supporting the vehicle. Drain the engine oil into a sealable container and install the drain bolt with a new gasket, tightening it to 33 ft. lbs. (44 Nm). Remove the front wheels and splash shield, then detach the center beam and the Oxygen sensor electrical connector. Remove the bolts from the support bracket on the exhaust pipe, followed by the nuts attaching the exhaust pipe to the exhaust manifold and catalytic converter. Discard the exhaust pipe gaskets and, if equipped with an automatic transaxle, remove the converter cover; if equipped with a manual transaxle, remove the clutch cover. Remove the oil pan nuts and bolts in a criss-cross pattern, taking care not to pry on the pan. Clean the oil pan mounting surface of old gasket material and engine oil. For installation, place a new oil pan gasket on the oil pan, applying liquid gasket to the corners of the curved section. Install the oil pan and tighten the nuts and bolts in sequence, first to 10 ft. lbs. (14 Nm) in two steps. If applicable, install the torque converter cover or clutch cover, tightening the bolts to 108 inch lbs. (12 Nm). Install the exhaust pipe with new gaskets and lock nuts, tightening the manifold nuts to 40 ft. lbs. (54 Nm) and the catalytic converter nuts to 25 ft. lbs. (33 Nm). Attach the bolts to the exhaust pipe support bracket and tighten to 13 ft. lbs. (18 Nm), then reconnect the Oxygen sensor. Reinstall the center beam, tightening the mounting bolts according to the vehicle model specifications, followed by the splash shield and front wheels. Lower the vehicle, refill the engine with oil, reconnect the negative battery cable, enter the radio security code, and start the engine to check for leaks. For the 3.0L engine, the process begins similarly with the disconnection of the negative battery cable and vehicle support. Remove the engine undercover, drain the engine oil, and replace the drain plug. Remove the front exhaust pipe and oil pan mounting bolts, then use a seal cutter to break the seal between the engine block and oil pan before removing the oil pan. Clean the oil pan flange and engine block mounting surface, apply sealant to the oil pan flange, and install the oil pan, tightening the bolts in sequence to 8.7 ft. lbs. (12 Nm). Reinstall the exhaust pipe and undercover, lower the vehicle, refill the engine with oil, reconnect the negative battery cable, and start the engine to check for leaks.
    Posted by HondaPartsNow Specialist
    Q:
    I was wondering does this also include the oil pan gasket? Posted by Customer: 1999 Honda Prelude
    A:
    NO IT DOES NOT. THIS OIL PAN TAKES A SILICONE GASKET. ULTRA FLANGE PART# 08718-009, OR HONDABOND PART# 08718-0004.
    Posted by HondaPartsNow Specialist 15/2/2022
    If you have any questions about this product, please don't hesitate to ask us. We will be happy to help you!

Genuine Honda Part 11200-P5K-010, the Right Choice

To ensure reliability, purchase Honda part # 11200-P5K-010 Pan, Oil. It is sometimes referred to as Honda Oil Pan. In terms of quality, OEM parts are the wise choice for Honda owners who want to keep their vehicles at peak performance. They are manufactured to follow official strict factory specifications and are made in world-class facilities. They undergo rigorous tests to ensure that they are durable and safe to use. This part fits 1997-2001 Honda Prelude.

HondaPartsNow.com is a leading supplier of genuine Honda parts and accessories such as Honda 11200P5K010 Pan, Oil. When it comes to choosing the right parts for your vehicle, the solution is simple: shop from our wide selection of genuine Honda parts at competitive prices available on HondaPartsNow.com. We prioritize your convenience, 100% satisfaction, and peace of mind by offering a user-friendly catalog, manufacturer-warranted OEM Honda parts, a hassle-free return policy, and swift delivery service.

Why choose Honda Parts Now

  • Dedicated Service

    Your complete satisfaction is our #1 goal

  • Lowest Prices

    Best deals on genuine OE parts from dealerships

  • Fast Delivery

    Orders are processed and delivered promptly