Contact Us Live Chat or 1-888-984-2011
My Garage
My Account
Cart
Make sure this part fits

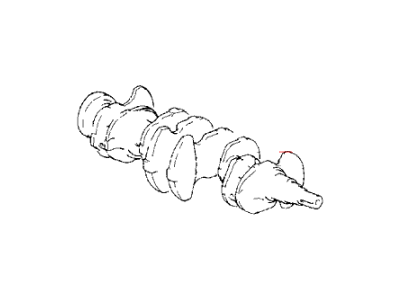
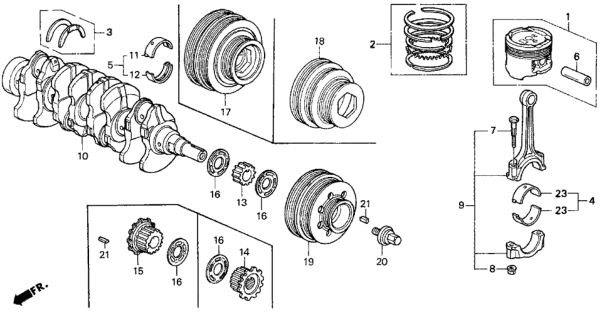
Honda 13310-PM3-010 Crankshaft

1988-1995 Honda 13310PM3010

Customer Questions & Expert Answers (5)
Honda 13310-PM3-010 Crankshaft
  • Part Description
    Crankshaft
  • Replaced By
    13300-PM3-305
  • Manufacturer
    Honda
Make sure this part fits
$935.82 MSRP: $1350.38
You Save: $414.56 (31%)
1
ADD TO CART
  • Related Parts
  • Product Specifications
  • Vehicle Fitment
  • Customer Questions & Expert Answers
  • Product Specifications

    BrandGenuine Honda
    Manufacturer Part Number13310-PM3-010
    Part DescriptionCrankshaft
    Item Dimensions19.4 x 7.6 x 7.1 inches
    Item Weight28.30 Pounds
    ConditionNew
    Fitment TypeDirect Replacement
    ManufacturerHonda
    SKU13310-PM3-010
    WarrantyThis genuine Honda part is guaranteed by Honda's factory warranty.
    Shipping & ReturnShipping Policy Return Policy
    Warning: California’s Proposition 65
  • Vehicle Fitment

    Year Make Model Body & Trim Emission & Transmission
    1991 Honda CRX2 Door DXKA 4AT, KA 5MT, KL 4AT, KL 5MT
    1990 Honda CRX2 Door DXKA 4AT, KA 5MT, KL 4AT, KL 5MT
    1989 Honda CRX2 Door DXKA 4AT, KA 5MT, KL 4AT, KL 5MT
    1988 Honda CRX2 Door DXKA 4AT, KA 5MT, KL 4AT, KL 5MT
    1991 Honda Civic3 Door DX, 3 Door STD, 4 Door DX, 4 Door LXKA 4AT, KA 4MT, KA 5MT, KL 4AT, KL 4MT, KL 5MT
    1990 Honda Civic3 Door DX, 3 Door STD, 4 Door DX, 4 Door LXKA 4AT, KA 4MT, KA 5MT, KL 4AT, KL 4MT, KL 5MT
    1989 Honda Civic3 Door DX, 3 Door STD, 4 Door DX, 4 Door LXKA 4AT, KA 4MT, KA 5MT, KL 4AT, KL 4MT, KL 5MT
    1988 Honda Civic3 Door DX, 3 Door STD, 4 Door DX, 4 Door LX, 5 Door (Wagovan), 5 Door DXKA 4AT, KA 4MT, KA 5MT, KL 4AT, KL 4MT, KL 5MT
    1995 Honda Del Sol2 Door SKA 4AT, KA 5MT
    1994 Honda Del Sol2 Door SKA 4AT, KA 5MT, KL 4AT, KL 5MT
    View More
  • Customer Questions & Expert Answers

    Q:
    Does this fit my car? Posted by HondaPartsNow Specialist
    A:
    You can Select Your Vehicle to check if 13310-PM3-010 fits your vehicle.
    Posted by HondaPartsNow Specialist
    Q:
    How to install Crankshaft on Honda Del Sol? Posted by Customer
    A:
    It is only assumed here that the engine block and crankshaft have been properly washed, checked and machined or rebuilt. Place the engine vertically with its bottom end upwards and unbolt the main bearing cap bridge, but do not retain any bearings in the journal. If they are, take out the original bearing inserts from block and caps, clean the bearing surfaces with a clean and lint-free cloth for maintaining their cleanliness. Clean the back sides of the new main bearing inserts and lay one in each main bearing saddle in the block, if there is a grooved insert then it has to be put in the right side. Set the corresponding bearing from each set on the main bearing cap with the tab in the recess provided. If crankshaft has been machined get oversize bearings; if standard get correct bearings by referring to the stamped codes. The flanged thrust washers should be fitted in the number four cap and saddle, the bearing faces should be cleaned and the oil holes should be checked in the crankshaft. Should the crankshaft be clean, place it in position over the main bearings and perform a check on the main bearing oil clearance following the use of Plastigage which must be placed parallel to the journal axis. Wipe the faces of the bearings in the cap bridge assembly and fit it into position but do not remove the Plastigage. Loose the assembly in three steps beginning with the middle bolts and it is important not to turn the crankshaft . After that, dismantle the assembly and compare the width of the crushed Plastigage and see the oil clearance with no influence of dirt or oil getting to the measurement. If the clearance is wrong ensure that the bearing inserts are of the right size. After that gently remove any Plastigage left on the journals and bearing faces. Remove the crankshaft, then using a file or scrape the bearing surfaces in the block, then apply a coat of fine coating of moly base grease or assembly lubricant on all the bearing surfaces together with the thrust faces. Check that the crankshaft journals are glossy before caring the crankshaft back into position, clean the bearing surface on the caps and lubricate. Attach the main bearing cap bridge assembly and the bolts and tighten the bolts starting with the center main and drilling outwards. Manually grab the crankshaft and try to rotate it to see if it binds with any of the pistons or connecting rods, then using feeler gauge or dial indicator assess the amount of crankshaft end play if it is worn or damage on the thrust faces or simply to confirm if new bearings where fitted. Replace with a new rear main oil seal.
    Posted by HondaPartsNow Specialist
    Q:
    How to remove and install crankshaft on Honda CRX? Posted by Customer
    A:
    Honda engines are supported on crankshaft main bearings, and it is incorporated with a large bridge type main bearing assembly as a single unit. Most of the 1.6 L (1590 cc) engines feature a main bearing cap in conjunction with a separate bridge assembly, and both parts are removed in the same manner. First of all, the engine has to be taken out of the car and set on a working stand, then the bolts and washer securing the crankshaft pulley, front cover, and if there is such, the air conditioning idler pulley should be taken off. The deflection of the timing belt should be checked before the removal of the timing belt and sprockets. The engine should then be inverted on the work stand to take off the flywheel, rear seal cover, oil pan, gasket, oil pump inlet and oil pump assembly. All bearing caps should always be labeled in order to facilitate easy replacement in the correct positions. The crankshaft should be turned until the piston connected to the connecting rod form which the cap is being removed is at the top so that the connecting rod cap can be removed and subsequently the connecting rod with the piston. This should be done for the rest of joining pulser assembling before removing the majore bearing caps and then lifting the crank shaft out of the block with care in order not to damage the upper thrust bearings. For installation the bearings if are to be reused must be identified for correct location during the assembly of the equipment. Main bearing inserts should be taken out of the block and caps, new rear oil seal should be fitted in the rear seal cover. Plain Polyethylene Grease should be laid on the opposite side of the rear crankshaft-surface and no sealer should be given forward of the oil sealer fray-line. Every machined surface of the crankshaft should be scrutinised for sharp edges or digs, which are known to hasten bearing wear. If the crankshaft main bearing journals have been refinned to a certain undersize the same undersize bearings should be used, the parts should not be dirty or oily so as to cause deformation and failure of the bearings. The upper main bearing inserts should be placed in position with the tang fitted in the slot, while the lower main bearing inserts to be located into the bearing caps. It should then be slowly brought back to a position where the crankshaft can be slowly lowered into position; the clearance of each main bearing should be measured and bearings selected to give the required clearance. Upon the fitting of the bearings a light covering of heavy engine oil should be placed on the journals and bearings before replacing all bearing caps in their correct positions. The upper thrust bearing should be probed to ensure that it is parallel to the connecting rod bearing and the end play on the crankshaft should be measured and the upper thrust bearing should be replaced if the end play exceeds the specified measurements. If the end play is within limits, it is recommended to check faces of the thrust bearing for wearing or existences of dirt. New bearing inserts must likewise be provided in the connecting rods as well as the caps; while clearance must be checked and if there are regular clearances, heavy engine oil must be applied. A crankshaft throw should be rotated to the bottom of the stroke, so that the piston is pressed down to the extent that the rod bearings come in contact with the crankshaft journal and the next step will be to fit the connecting rod cap. When the piston and the connecting rod are assembled it is important to check the connecting rod crankshaft journal. The engine should then be turned on setting of the timing belt, sprockets, front cover, oil seal, crankshaft pulley. It is recommended that both the oil pan and the oil pump should be cleaned and that the oil pump should be primed prior to the installation of the oil pan, the oil pump and oil pump screen. In the case of the flywheel, it should be placed on the crankshaft and have the bolts fastened to the correct torque; the clutch disc and pressure plate should be fitted in case of manual transaxles. The engine should be placed in an upright position for the fitting of the oil level with the dipstick, fitting of accessory drive pulley and so as to adjust the drive as well as the accessory belts. Last, the clutch assembly or torque converter is to be fitted, accompanied by the oil pan and then the engine must be unbolted from the work stand for the purpose of it being fitted in the car. For cleaning and inspection of bearing oil clearance, the cap must be taken off the bearing to be checked and the crankshaft journal and the bearing insert must be cleaned properly. What happens is that Plastigage should be fitted along the loaded width of the bearing insert, and after replacing the cap and tightening it to the standard prescribed torque, the amounts of bearing clearance can be measured by comparing the width that is rendered on the scale of the Plastigage's envelope. If the bearing insert and journal look like they are in good condition, and within tolerances, it does not require service; otherwise, the cause of failure must be established before replacement. For crankshaft endplay and connecting rod side play, pry bar should be used to obtained the space existed between the thrust bearing and crankshaft and compare it with specifications. However it was seen that when excessive clearance is obtained, a main bearing with a thrust surface or crank machining might be required. Piston to connecting rod clearance can also be checked in the same way. If a journal is damaged, it can be machined back to a standard undersize, however it will be usual practice to replace a damaged crankshaft with reground shaft kit , as this comes with the relevant main and rod bearings and has been ground and polished to undersize and for superior reliability.
    Posted by HondaPartsNow Specialist
    Q:
    How should the diameter of the main and connecting rod journals be measured for the 1995 Honda Del Sol? Posted by Customer
    A:
    Measure the diameter of the main and connecting rod journals with a micrometer, comparing results at several points to detect taper and out-of-round conditions.
    Posted by HondaPartsNow Specialist
    Q:
    What must be done to the rear main oil seal housing before removing the crankshaft for the 1993 Honda Del Sol? Posted by Customer
    A:
    The rear main oil seal housing must be unbolted and separated from the block.
    Posted by HondaPartsNow Specialist
    If you have any questions about this product, please don't hesitate to ask us. We will be happy to help you!

Genuine Honda Part 13310-PM3-010, the Right Choice

To ensure reliability, purchase Honda part # 13310-PM3-010 Crankshaft. It is sometimes referred to as Honda Crankshaft. In terms of quality, OEM parts are the wise choice for Honda owners who want to keep their vehicles at peak performance. They are manufactured to follow official strict factory specifications and are made in world-class facilities. They undergo rigorous tests to ensure that they are durable and safe to use. This part fits 1988-1991 Honda CRX, 1988-1991 Honda Civic, 1993-1995 Honda Del Sol.

HondaPartsNow.com is a leading supplier of genuine Honda parts and accessories such as Honda 13310PM3010 Crankshaft. When it comes to choosing the right parts for your vehicle, the solution is simple: shop from our wide selection of genuine Honda parts at competitive prices available on HondaPartsNow.com. We prioritize your convenience, 100% satisfaction, and peace of mind by offering a user-friendly catalog, manufacturer-warranted OEM Honda parts, a hassle-free return policy, and swift delivery service.

Why choose Honda Parts Now

  • Dedicated Service

    Your complete satisfaction is our #1 goal

  • Lowest Prices

    Best deals on genuine OE parts from dealerships

  • Fast Delivery

    Orders are processed and delivered promptly